Defining a Script
This page explains how to add a new script to OneClickExt so that it appears in the Spectrum console menu and can be launched by users. It covers choosing the correct launcher type, writing the properties definition, and adding the corresponding menu entry.
Adding a script involves two steps:
- Defining the script in a properties file.
- Adding a menu entry in the Spectrum console menu configuration XML.
Step 1 — Choose the launcher type
Three launcher classes exist, each for a different use case. You select one by specifying the class in the menu XML.
| Class | Use when |
|---|---|
ScriptLauncher |
The script runs against exactly one device selected in the console |
MultiScriptLauncher |
The script runs against one or more devices, or against all members of a Global Collection |
GlobalScriptLauncher |
The script needs no device context at all (e.g. a report generator) |
Step 2 — Define the script in properties
Scripts are defined in oneclickext.props or in any additional properties file listed under oneclickext.additional.props. Each script has a unique name (the <scriptitem> identifier) used throughout its configuration.
Minimum required properties
oneclickext.scripts.<scriptitem>.command: <path/to/script>
For a MultiScriptLauncher script, also add:
oneclickext.scripts.<scriptitem>.multidevice.active: true
Using path variables
To avoid hardcoding paths and extensions, define shared variables and reference them with ${...}:
# Shared path settings (Windows example)
oneclickext.scripts.path: ..\scripts\
oneclickext.scripts.ext:  .bat
oneclickext.scripts.encoding: CP437

# Per-script references
oneclickext.scripts.RebootDevice.command:  ${oneclickext.scripts.path}RebootDevice${oneclickext.scripts.ext}
oneclickext.scripts.RebootDevice.encoding: ${oneclickext.scripts.encoding}
For Linux/Unix:
oneclickext.scripts.path: ../scripts/
oneclickext.scripts.ext:  .sh
oneclickext.scripts.encoding: UTF-8
Execution settings
# Show script stdout in the result dialog (default: true)
oneclickext.scripts.<scriptitem>.showOutput: true

# Show exit code in the result dialog (default: true)
oneclickext.scripts.<scriptitem>.showExitCode: true

# Run one instance at a time per device (AUTO), or allow parallel runs (NONE)
oneclickext.scripts.<scriptitem>.exec.class: AUTO

# Run all executions of this script sequentially, regardless of device (default: false)
oneclickext.scripts.<scriptitem>.exec.sequential: false

# Priority relative to other scripts (default: stdprio)
oneclickext.scripts.<scriptitem>.prio: stdprio
MultiScriptLauncher-specific settings
oneclickext.scripts.<scriptitem>.multidevice.active: true

# Maximum number of devices (default: 10)
oneclickext.scripts.<scriptitem>.multidevice.maxdevices: 10

# Additional Spectrum attributes to fetch for each device (beyond Name and Network_Address)
# Attribute IDs in hex; these can then be used as parameter values via .attr
oneclickext.scripts.<scriptitem>.multidevice.attributes: 0x129e7
UI texts
# Text shown above the parameter input fields
oneclickext.scripts.<scriptitem>.paramtext: Enter credentials for all devices:

# Confirmation question shown before execution (supports \n and %Pn% substitution)
oneclickext.scripts.<scriptitem>.secquestion: Are you sure you want to reboot?

# Label above the device list (MultiScriptLauncher only)
oneclickext.scripts.<scriptitem>.devicestext: Devices for RebootDevice:
Step 3 — Add a menu entry
Add an <item> element to the Spectrum console menu configuration file ($SPECROOT/custom/console/config/custom-menu-config.xml). The name attribute must match the <scriptitem> identifier used in the properties.
<menu name="Scripts">

    <!-- One or more devices -->
    <item name="RebootDevice">
        <popup-visibility>allways</popup-visibility>
        <action>
            <context>com.aprisma.spectrum.app.topo.client.render.ModelContext</context>
            <class>de.dicos.spectrum.oneclick.client.MultiScriptLauncher</class>
        </action>
    </item>

    <!-- Exactly one device -->
    <item name="SetModelName">
        <popup-visibility>allways</popup-visibility>
        <action>
            <context>com.aprisma.spectrum.app.topo.client.render.ModelContext</context>
            <class>de.dicos.spectrum.oneclick.client.ScriptLauncher</class>
        </action>
    </item>

    <!-- No device -->
    <item name="testscript">
        <popup-visibility>allways</popup-visibility>
        <action>
            <class>de.dicos.spectrum.oneclick.client.GlobalScriptLauncher</class>
        </action>
    </item>

</menu>
ScriptLauncher and MultiScriptLauncher require a <context> element pointing to ModelContext. GlobalScriptLauncher does not.
Routing to an alternative daemon
To route a specific script to a different OneClickExt daemon, append that daemon's hostname and RMI port to the item name:
<item name="SetModelName_myserver_13689">
The client parses the suffix and connects directly to the RMI daemon at myserver:13689, bypassing the primary (and secondary) daemon configured in the JNLP file. The script must still be defined in oneclickext.props using the base name (SetModelName), without the suffix.
Complete example — RebootDevice
The following is the complete properties definition for the RebootDevice script from conf/testscript.props.
# Script command
oneclickext.scripts.RebootDevice.command:  ${oneclickext.scripts.path}RebootDevice${oneclickext.scripts.ext}
oneclickext.scripts.RebootDevice.encoding: ${oneclickext.scripts.encoding}

# Multi-device settings
oneclickext.scripts.RebootDevice.multidevice.active:      true
oneclickext.scripts.RebootDevice.multidevice.maxdevices:  10
oneclickext.scripts.RebootDevice.multidevice.attributes:  0x129e7

# Execution
oneclickext.scripts.RebootDevice.exec.sequential: false
oneclickext.scripts.RebootDevice.exec.class:      AUTO
oneclickext.scripts.RebootDevice.showOutput:      true
oneclickext.scripts.RebootDevice.showExitCode:    true

# UI texts
oneclickext.scripts.RebootDevice.devicestext:  Devices for RebootDevice:
oneclickext.scripts.RebootDevice.paramtext:    Enter credentials for all devices:
oneclickext.scripts.RebootDevice.secquestion: Are you sure you want to reboot?
oneclickext.scripts.RebootDevice.width:       230

# Parameters
oneclickext.scripts.RebootDevice.params: p1 p2 p3 p4 p5

oneclickext.scripts.RebootDevice.p1.name:   Network Address
oneclickext.scripts.RebootDevice.p1.attr:   0x12d7f
oneclickext.scripts.RebootDevice.p1.hidden: true

oneclickext.scripts.RebootDevice.p2.name:     User
oneclickext.scripts.RebootDevice.p2.value:    SpecAdmin
oneclickext.scripts.RebootDevice.p2.editable: false

oneclickext.scripts.RebootDevice.p3.name:    Password
oneclickext.scripts.RebootDevice.p3.visible: false

oneclickext.scripts.RebootDevice.p4.name:   Topology
oneclickext.scripts.RebootDevice.p4.attr:   0x129e7
oneclickext.scripts.RebootDevice.p4.hidden: true

oneclickext.scripts.RebootDevice.p5.name:   Name
oneclickext.scripts.RebootDevice.p5.attr:   0x1006e
oneclickext.scripts.RebootDevice.p5.hidden: true
For a detailed explanation of parameter options, see Parameters, Validators, and Actions.
What the user sees
Once the menu entry is in place and the daemon is running, the script appears in the right-click context menu of any device in the Spectrum topology view:
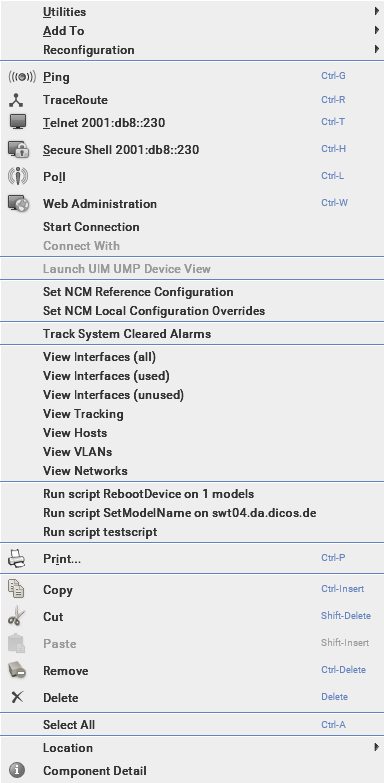
Launch flow
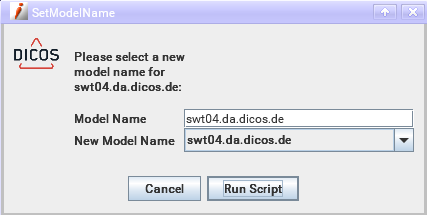
Clicking a script entry triggers the following sequence:
- Parameter dialog — the user fills in any input fields and clicks Run Script.
- Confirmation (optional) — if
secquestionis configured, a Yes/No dialog asks the user to confirm before execution proceeds. The dialog text is taken from thesecquestionproperty. - Output window — the script runs and its output is streamed into a result window. A completion dialog reports the exit code when the script finishes.
After clicking Run Script, the output window opens and the script runs:
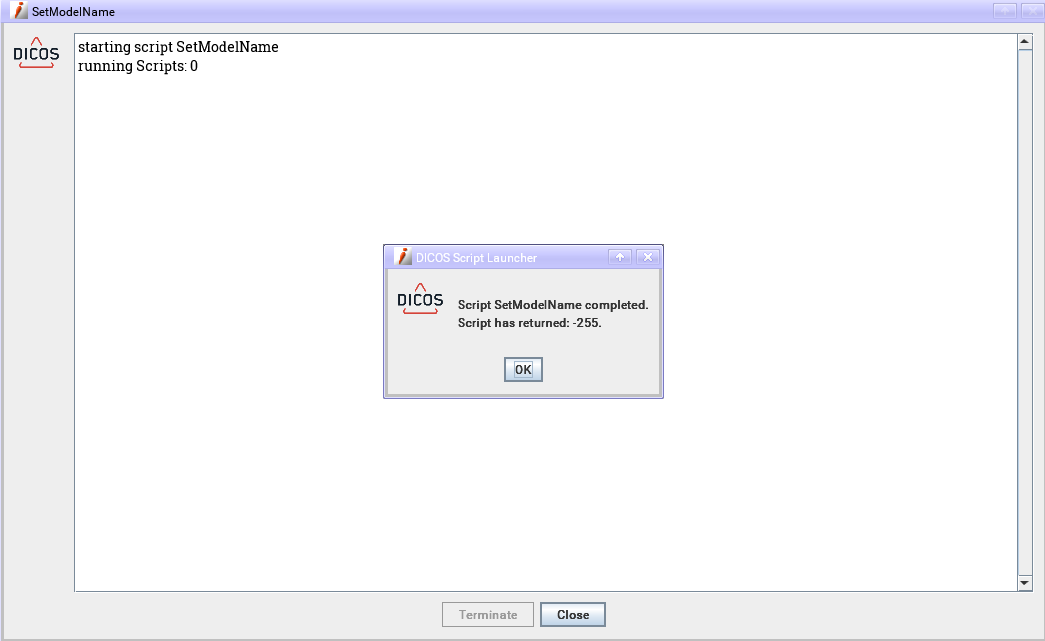
See Exit code formatting for how to highlight the exit code in the result.