Installation with Spectrum
This page describes how to install OneClickExt as a Spectrum management module on a Linux server. The installation uses the setup.sh script included in the distribution archive, which configures the daemon and registers it with Spectrum's process management system.
Prerequisites
- The distribution archive
VCD-DcsOcExt_<version>_<spectrum_version>.tar - Root access on the server
- SpectroSERVER and OneClick must be stopped before installation (see below)
- X11 forwarding enabled in your SSH session (
ssh -Xorssh -Y) — the installer launches a GUI window
Step 1 — Stop Spectrum services
Run as the Spectrum install owner (typically spectrum):
The installer modifies Spectrum configuration files that cannot be changed while the services are running. Stop them in this order:
$SPECROOT/tomcat/bin/stopTomcat.sh
$SPECROOT/webtomcat/bin/shutdown.sh
$SPECROOT/bin/stopSS.pl
Wait for both processes to terminate before continuing.
Step 2 — Run the installer
Run as root:
Copy the distribution archive to the server and unpack it:
tar xf VCD-DcsOcExt_<version>_<spectrum_version>.tar
Run setup.sh from the extracted directory:
$ ./setup.sh
Installing to /opt/SPECTRUM ...

    OneClickExt Server is myserver (y/n)? y
    Enter the RMI Port (1025-65535)? 16016
    Enter the RMI Connection Port (1025-65535)? 16017
    OneClickExt Server = myserver, RMI Port = 16016, RMI Conn Port = 16017 (y/n)? y

    Hostname of the Main Location Server? myserver
    Hostname of the Backup Location Server? myserver
    SpectroSERVER is myserver (y/n)? y
    SpectroSERVER is myserver, Location Servers are myserver / myserver (y/n)? y

OneClickExtension setup:

  MainLocation Server = myserver
  BackupLocation Server = myserver
  SpectroSERVER = myserver
  Is primary = Y
  Autostart Ticket = Y
  OneClickExt Host = myserver
  RMI Port = 16016
  RMI Connection Port = 16017

saving /tmp/dcssetup.config ...
starting installer ...
The setup script asks for:
| Prompt | What to enter |
|---|---|
| OneClickExt Server | Hostname of the server running the OneClickExt daemon (usually the same host) |
| RMI Port | Port the daemon listens on for client connections (default: 13689) |
| RMI Connection Port | Second port used by Java RMI for object communication (default: 13690) |
| Main Location Server | Hostname of the Spectrum Main Location Server |
| Backup Location Server | Hostname of the Spectrum Backup Location Server |
| SpectroSERVER | Hostname of the Spectrum Management Server (MOM) |
Both RMI ports must be open in any firewall between the Spectrum console host and the daemon host.
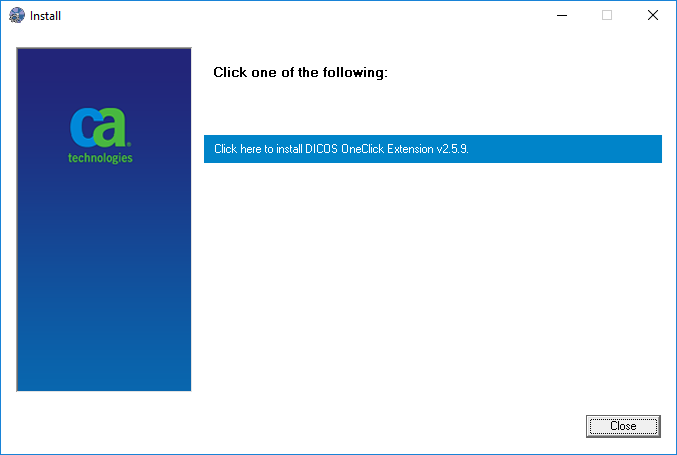
After the text prompts, setup.sh launches a graphical installation wizard. Complete the wizard to finish the installation:
Step 3 — Restart Spectrum services
Run as the Spectrum install owner (typically spectrum):
After the installer completes, start the services again:
$SPECROOT/bin/startSS.pl
$SPECROOT/tomcat/bin/startTomcat.sh
$SPECROOT/webtomcat/bin/startup.sh
Step 4 — Integrate OneClickExt into OneClick
Run as the Spectrum install owner (typically spectrum):
The installer registers the CHECKONECLICKEXT idb ticket, which automatically patches oneclick.jnlp to load the extension. After SpectroSERVER has started, verify the OneClickExt Server is running:
ps -fu spectrum | grep OneClickExtServer
The process should appear in the output. If it does not, check the daemon log at $SPECROOT/DICOS/OneClickExt/logs/oneclickext.log.
If the menu entries do not appear after starting the console, see Troubleshooting.
To verify the installed version:
cat $SPECROOT/DICOS/OneClickExt/oneclickext.vers
Step 5 — Integrate OneClickExt into OneClick WebApp
For each OneClick Server where the OneClick Extension has been installed, open the WebSwing administration at http[s]://<oneclick_url>:9443/admin/apps/oneclickwebapp.
In the section Applications -> App Config (
-Doneclickext.rmi.host=<server> -Doneclickext.rmi.port=16016
If running in a fault-tolerant environment, specify the secondary OneClickExt Daemon as well by adding
-Doneclickext.rmi.secondary.host=<secondary_server> -Doneclickext.rmi.secondary.port=16016
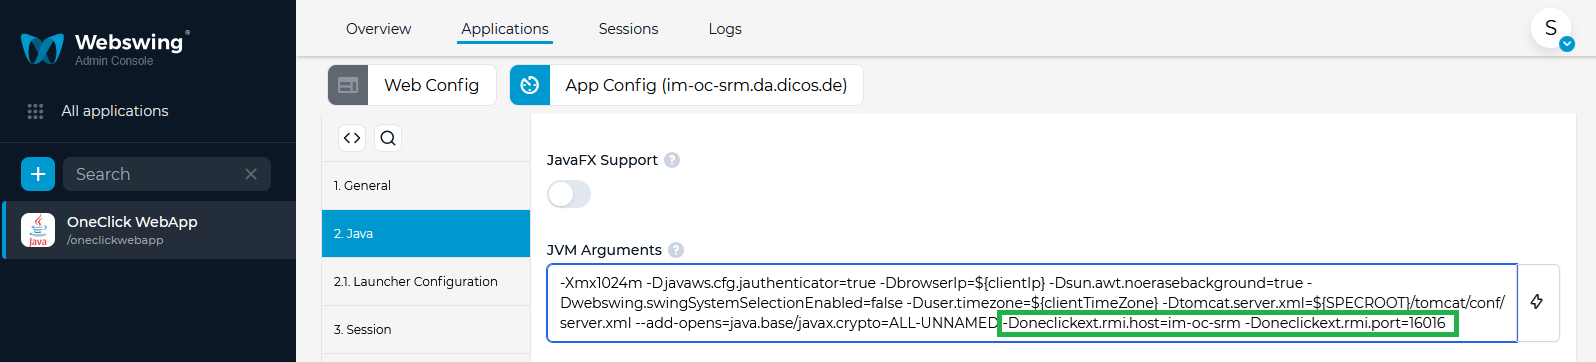
Click Apply in the lower right corner to save the settings. For the changes to take effect, the OneClick WebApp console needs to be restarted.
Step 6 — Upgrade notes
The installer manages two separate oneclickext.props files that serve different purposes:
Client-side file ($SPECROOT/tomcat/webapps/spectrum/oneclickext.props): Contains only the RMI connection properties (host and port). The installer always regenerates this file from the values entered during setup, so no manual action is required on upgrade.
Server-side (daemon) configuration ($SPECROOT/DICOS/OneClickExt/bin/oneclickext.props): This is the full configuration file for the OneClickExt daemon — script definitions, thread settings, permissions, etc. The installer does not overwrite an existing file here. When upgrading, compare the new default configuration (provided separately by DICOS support) against your existing file and merge any new properties manually.