Standalone Installation
This page describes how to install the OneClickExt daemon and the Script Server web application in standalone mode, independently of a Spectrum instance. This setup is used when scripts need to be invoked from a web browser or an external system without the Spectrum console, or when the daemon runs on a separate host.
What you will install
The base installation folder is referred to as $DCSROOT (Linux) / %DCSROOT% (Windows) throughout this guide. The defaults are /opt/dcssl on Linux and C:\DcsSL on Windows, but the location can be freely chosen — all internal path references are relative.
| Component | Purpose | Windows path | Linux path |
|---|---|---|---|
| Java 17 JDK | Runtime for the daemon and Tomcat | %DCSROOT%\Java |
$DCSROOT/Java |
| Apache Tomcat | Servlet container for the Script Server | %DCSROOT%\webtomcat |
$DCSROOT/webtomcat |
| OneClickExt Daemon | The RMI server process | %DCSROOT%\DICOS |
$DCSROOT/DICOS |
| Script Server web app | HTTP interface for script invocation | %DCSROOT%\webtomcat\webapps |
$DCSROOT/webtomcat/webapps |
Prerequisites
Download the following before starting:
- Distribution archives:
OneClickExtSa_d_<version>.tar.gz— the daemonOneClickExtSa_sl_<version>.tar.gz— the web application
- A dedicated service user (e.g.
spectrum) who will own the installation directory. If the user does not exist yet:sudo useradd -r spectrum
Java and Apache Tomcat are installed as part of Steps 1 and 2 below.
Most installation steps below are run as the spectrum user. Only the initial directory setup and the final systemd registration require root (sudo). Log in as spectrum or prefix each command with sudo -u spectrum as appropriate.
Installation steps
0. Set up the base directory
Create %DCSROOT% (e.g. C:\DcsSL) manually before continuing.
Create $DCSROOT as root and assign ownership to the service user. Then switch to the service user for all remaining steps:
sudo mkdir -p /opt/dcssl
sudo chown spectrum:spectrum /opt/dcssl
Log in as the service user and set the variable for the current session:
su - spectrum
export DCSROOT=/opt/dcssl
Add export DCSROOT=/opt/dcssl to ~/.bash_profile so the variable is available in future sessions.
1. Install Java 17
Install the JDK to %DCSROOT%\Java. If the JRE is installed instead of the full JDK, the directory must still be named Java so that the startup scripts and jsl64.ini can locate the runtime.
After installation, verify that %DCSROOT%\Java\bin\java.exe exists.
Install via your distribution's package manager:
# Debian / Ubuntu
sudo apt install openjdk-17-jdk

# RHEL / Rocky Linux
sudo dnf install java-17-openjdk-devel
Alternatively, download and extract the JDK manually to $DCSROOT/Java and set JAVA_HOME accordingly.
Verify the installation:
java -version
2. Install Tomcat
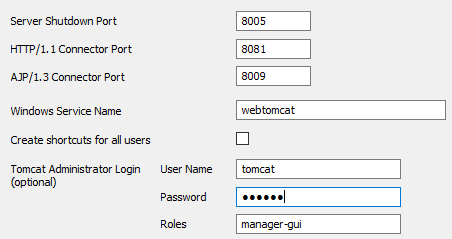
Install Tomcat to %DCSROOT%\webtomcat with the Windows service name webtomcat.
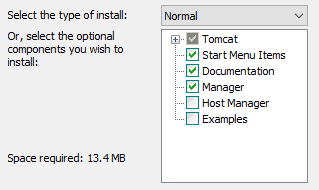


Download Apache Tomcat 9 or later from tomcat.apache.org and extract it to the target directory:
wget https://downloads.apache.org/tomcat/tomcat-<major>/v<version>/bin/apache-tomcat-<version>.tar.gz

mkdir -p $DCSROOT/webtomcat
tar xzf apache-tomcat-<version>.tar.gz \
    -C $DCSROOT/webtomcat \
    --strip-components=1
chmod +x $DCSROOT/webtomcat/bin/*.sh
Replace <major> with the major version number (e.g. 10) and <version> with the full version (e.g. 10.1.40).
Verify the installation by checking that startup.sh and shutdown.sh are present in $DCSROOT/webtomcat/bin/.
3. Install the OneClickExt daemon and web application
Both components are delivered as tar archives.
- Unpack
OneClickExtSa_d_<version>.tar.gzto%DCSROOT%\DICOS. - Unpack
OneClickExtSa_sl_<version>.tar.gzto%DCSROOT%\webtomcat\webapps.
mkdir -p $DCSROOT/DICOS
tar xzf OneClickExtSa_d_<version>.tar.gz -C $DCSROOT/DICOS
chmod +x $DCSROOT/DICOS/OneClickExt/bin/*.sh
mkdir -p $DCSROOT/DICOS/OneClickExt/logs

tar xzf OneClickExtSa_sl_<version>.tar.gz -C $DCSROOT/webtomcat/webapps
The systemd service runs as the spectrum user by default (configurable via installSystemdFilesUser.sh -u <username>). Because $DCSROOT is already owned by spectrum (from Step 0), no ownership change is needed.
If Java was installed via the package manager rather than manually to $DCSROOT/Java, create a symlink so the service file can locate it:
mkdir -p $DCSROOT/Java
ln -s /usr/lib/jvm/jre-17-openjdk $DCSROOT/Java/jre
Note
When upgrading from a previous version, back up the existing files before unpacking.
Next steps
After installation, the properties file is placed as $DCSROOT/DICOS/OneClickExt/bin/oneclickext.props_<version>. Rename it to oneclickext.props before editing:
mv $DCSROOT/DICOS/OneClickExt/bin/oneclickext.props_<version> \
   $DCSROOT/DICOS/OneClickExt/bin/oneclickext.props
Then configure the daemon connection settings in $DCSROOT/DICOS/OneClickExt/bin/oneclickext.props:
oneclickext.mls.primary:  <Main Location Server>
oneclickext.mls.backup:   <Backup Location Server>
oneclickext.ss.host:      <SpectroSERVER hostname>
oneclickext.ss.user:      <Spectrum username>
oneclickext.rmi.port:     13689
oneclickext.rmi.connport: 13690
rmi.port is the RMI registry port where the daemon listens for client connections. rmi.connport is the second port Java RMI uses for object data transfer. Both ports must be open in any firewall between the Spectrum console host and the daemon host. The defaults (13689/13690) are fine unless they conflict with another service on your server.
Then register the daemon as a system service:
Copy the generated jsl64.ini file to the bin directory and install the service as administrator:
jsl64 -install
Check jsl64.ini for these settings beforehand (adjust paths if %DCSROOT% differs from the default C:\DcsSL):
wrkdir=C:/DcsSL/DICOS/OneClickExt/bin
jrepath=C:/DcsSL/Java/jre
jvmtype=server
Note
For jvmtype, check whether the jvm.dll inside your Java installation is under a server or client subdirectory and set the value accordingly.
Start the service:
net start oneclickextd
To uninstall before an upgrade:
jsl64 -remove
Run the systemd installer script as root from the bin directory:
sudo ./installSystemdFilesUser.sh
sudo systemctl enable oneclickext
sudo systemctl start oneclickext
Verify the service is running:
systemctl status oneclickext
The output should show Active: active (running). If it shows active (auto-restart) or failed, check the log at $DCSROOT/DICOS/OneClickExt/logs/oneclickext.log or run journalctl -u oneclickext for the full output.
To uninstall:
sudo ./uninstallSystemdFilesUser.sh