Service Templates
- Service templates provide a reusable foundation for new services. This reduces repetitive coding for common elements.
- Use the API Gateway Manager to create templates:
- Include standard code blocks that are used across most services.
- Add variables to be filled in during service deployment.
- Define optional assertion blocks for flexible customization.
Template Parts
Templates have two key components:
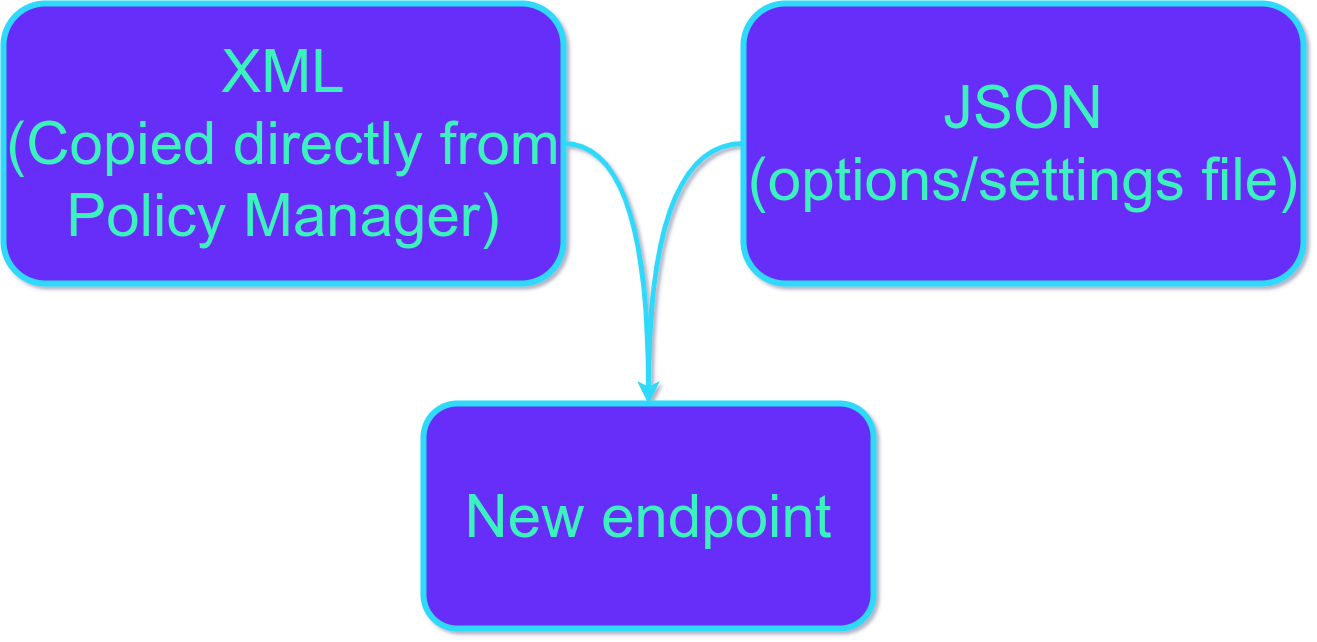
- JSON file: Outlines the template structure, including all variables and conditional blocks.
- XML file: Holds the policy that will govern the new service.
Definition descriptions
XML Policy Definition
How to get the policy XML
Getting policy XML: Two easy methods:
- Policy Manager: Export the XML from an existing service.
- Copy & Paste: Select the assertions you want and directly paste the generated XML code into your editor/form.
JSON Definition
First, let’s look at an example and then break it down:
{
  "$schema": "https://apiida.com/schemas/layer7-template",
  "$version": "1.0",
  "name": "Basic template example",
  "description": "This is a basic template to demo service templates",
  "blocks": [
    {
      "name": "useSSL",
      "description": "This API will only be available via SSL / https",
      "group": "Authentication"
    },
    {
      "name": "auth",
      "description": "Means of authentication",
      "options": [
        {
          "value": "basic",
          "text": "http Basic Authentication"
        },
        {
          "value": "cert",
          "text": "Client Certificate"
        }
      ],
      "group": "Authentication"
    },
    {
      "name": "validateBackendResults",
      "description": "Validate backend results against the Swagger-File"
    }
  ],
  "variables": [
    {
      "name": "comment",
      "description": "This value is inserted into the policy",
      "type": "string",
      "required": true
    },
    {
      "name": "date",
      "description": "Example for another datatype",
      "type": "date",
      "required": true,
      "group": "Authentication"
    },
    {
      "name": "someElement",
      "description": "Select something",
      "type": "select",
      "required": false,
      "options": [
        {
          "value": "A",
          "text": "This inserts A"
        },
        {
          "value": "B",
          "text": "This inserts B"
        }
      ]
    }
  ]
}
Variables, Blocks and Groups
Templates use variables, blocks, and groups for customization:
- Variables: Placeholders filled in by the user when creating a new service.
- Blocks: Sections of policy code included or excluded based on user choices.
- Groups: Organize related settings for a cleaner template structure. Within groups, variables and blocks maintain the order from your JSON definition.
Data Types
| Type | Description |
| string | This datatype acts like a normal string. Please be advised that its inserted as it is. Which means that no base64 transformation happens. This datatype is not allowed to contain XML or HTML. |
| integer | A number without a fractional component (i.e. 5) |
| float | A number with a fractional component (i.e. 5.25) |
| date | A date value without time information |
| time | A time (formatted according to the format defined in the configuration) |
| datetime | A date value with time information |
| rawstring | In contrast to the string data type, this type allows any string, including XML or HTML. |
| select | A list of options. The value that is inserted and the text that is shown can be different from each other. |
Modifiers
Modifiers define additional constraints for the entered values.
| Modifier | Description |
| required | true / false. If a variable is declared to be required it will not be possible to create a new service if no value is entered in the variable. |
XML Policy Definition with placeholders to work with JSON Definition
- Variables: Replace placeholders with double braces. Example: {{service_name}}
- Blocks: Embed definitions within XML comments for valid structure. Example: ``
- Select blocks: For dynamic content use this format: {{block_name=value}}. Example:
{{authentication_type=basic}}
The format for a block is:
<!-- {{myBlock}} -->
<... logic to include if myBlock is selected ...>
<!-- {{/myBlock}} -->

<!-- {{myBlockA=choice1}} -->
<... logic to include if choice1 is selected ...>
<!-- {{/myBlockA}} -->
<!-- {{myBlockA=choice2}} -->
<... logic to include if choice2 is selected ...>
<!-- {{/myBlockA}} -->

<L7p:Comment stringValue="{{someElement}}"/>
Basic example:
XML Policy Definition
Get your policy XML by:
- Exporting from an existing service within the Policy Manager.
-
Selecting specific assertions and using Copy & Paste.
-
Example: We illustrate this with a basic policy containing four comments.
Example: Policy Manager Export
- The code below shows what the export looks like. This is your starting point.
- Important: You must edit this example to include placeholders and triggers (instructions provided 2 sections below).
<wsp:Policy xmlns:L7p="http://www.layer7tech.com/ws/policy" xmlns:wsp="http://schemas.xmlsoap.org/ws/2002/12/policy">
    <wsp:All wsp:Usage="Required">
        <L7p:CommentAssertion>
            <L7p:Comment stringValue="some comment"/>
        </L7p:CommentAssertion>
        <L7p:CommentAssertion>
            <L7p:Comment stringValue="SSL"/>
        </L7p:CommentAssertion>
        <L7p:CommentAssertion>
            <L7p:Comment stringValue="Auth BASIC"/>
        </L7p:CommentAssertion>
        <L7p:CommentAssertion>
            <L7p:Comment stringValue="Auth CERT"/>
        </L7p:CommentAssertion>
    </wsp:All>
</wsp:Policy>
JSON Definition
Here is the example again, Copy and paste it under the Template tab:
{
  "$schema": "https://apiida.com/schemas/layer7-template",
  "$version": "1.0",
  "name": "Basic template example",
  "description": "This is a basic template to demo service templates",
  "blocks": [
    {
      "name": "useSSL",
      "description": "This API will only be available via SSL / https",
      "group": "Authentication"
    },
    {
      "name": "auth",
      "description": "Means of authentication",
      "options": [
        {
          "value": "basic",
          "text": "http Basic Authentication"
        },
        {
          "value": "cert",
          "text": "Client Certificate"
        }
      ],
      "group": "Authentication"
    },
    {
      "name": "validateBackendResults",
      "description": "Validate backend results against the Swagger-File"
    }
  ],
  "variables": [
    {
      "name": "comment",
      "description": "This value is inserted into the policy",
      "type": "string",
      "required": true
    },
    {
      "name": "date",
      "description": "Example for another datatype",
      "type": "date",
      "required": true,
      "group": "Authentication"
    },
    {
      "name": "someElement",
      "description": "Select something",
      "type": "select",
      "required": false,
      "options": [
        {
          "value": "A",
          "text": "This inserts A"
        },
        {
          "value": "B",
          "text": "This inserts B"
        }
      ]
    }
  ]
}
XML Policy Definition with placeholders to work with JSON Definition
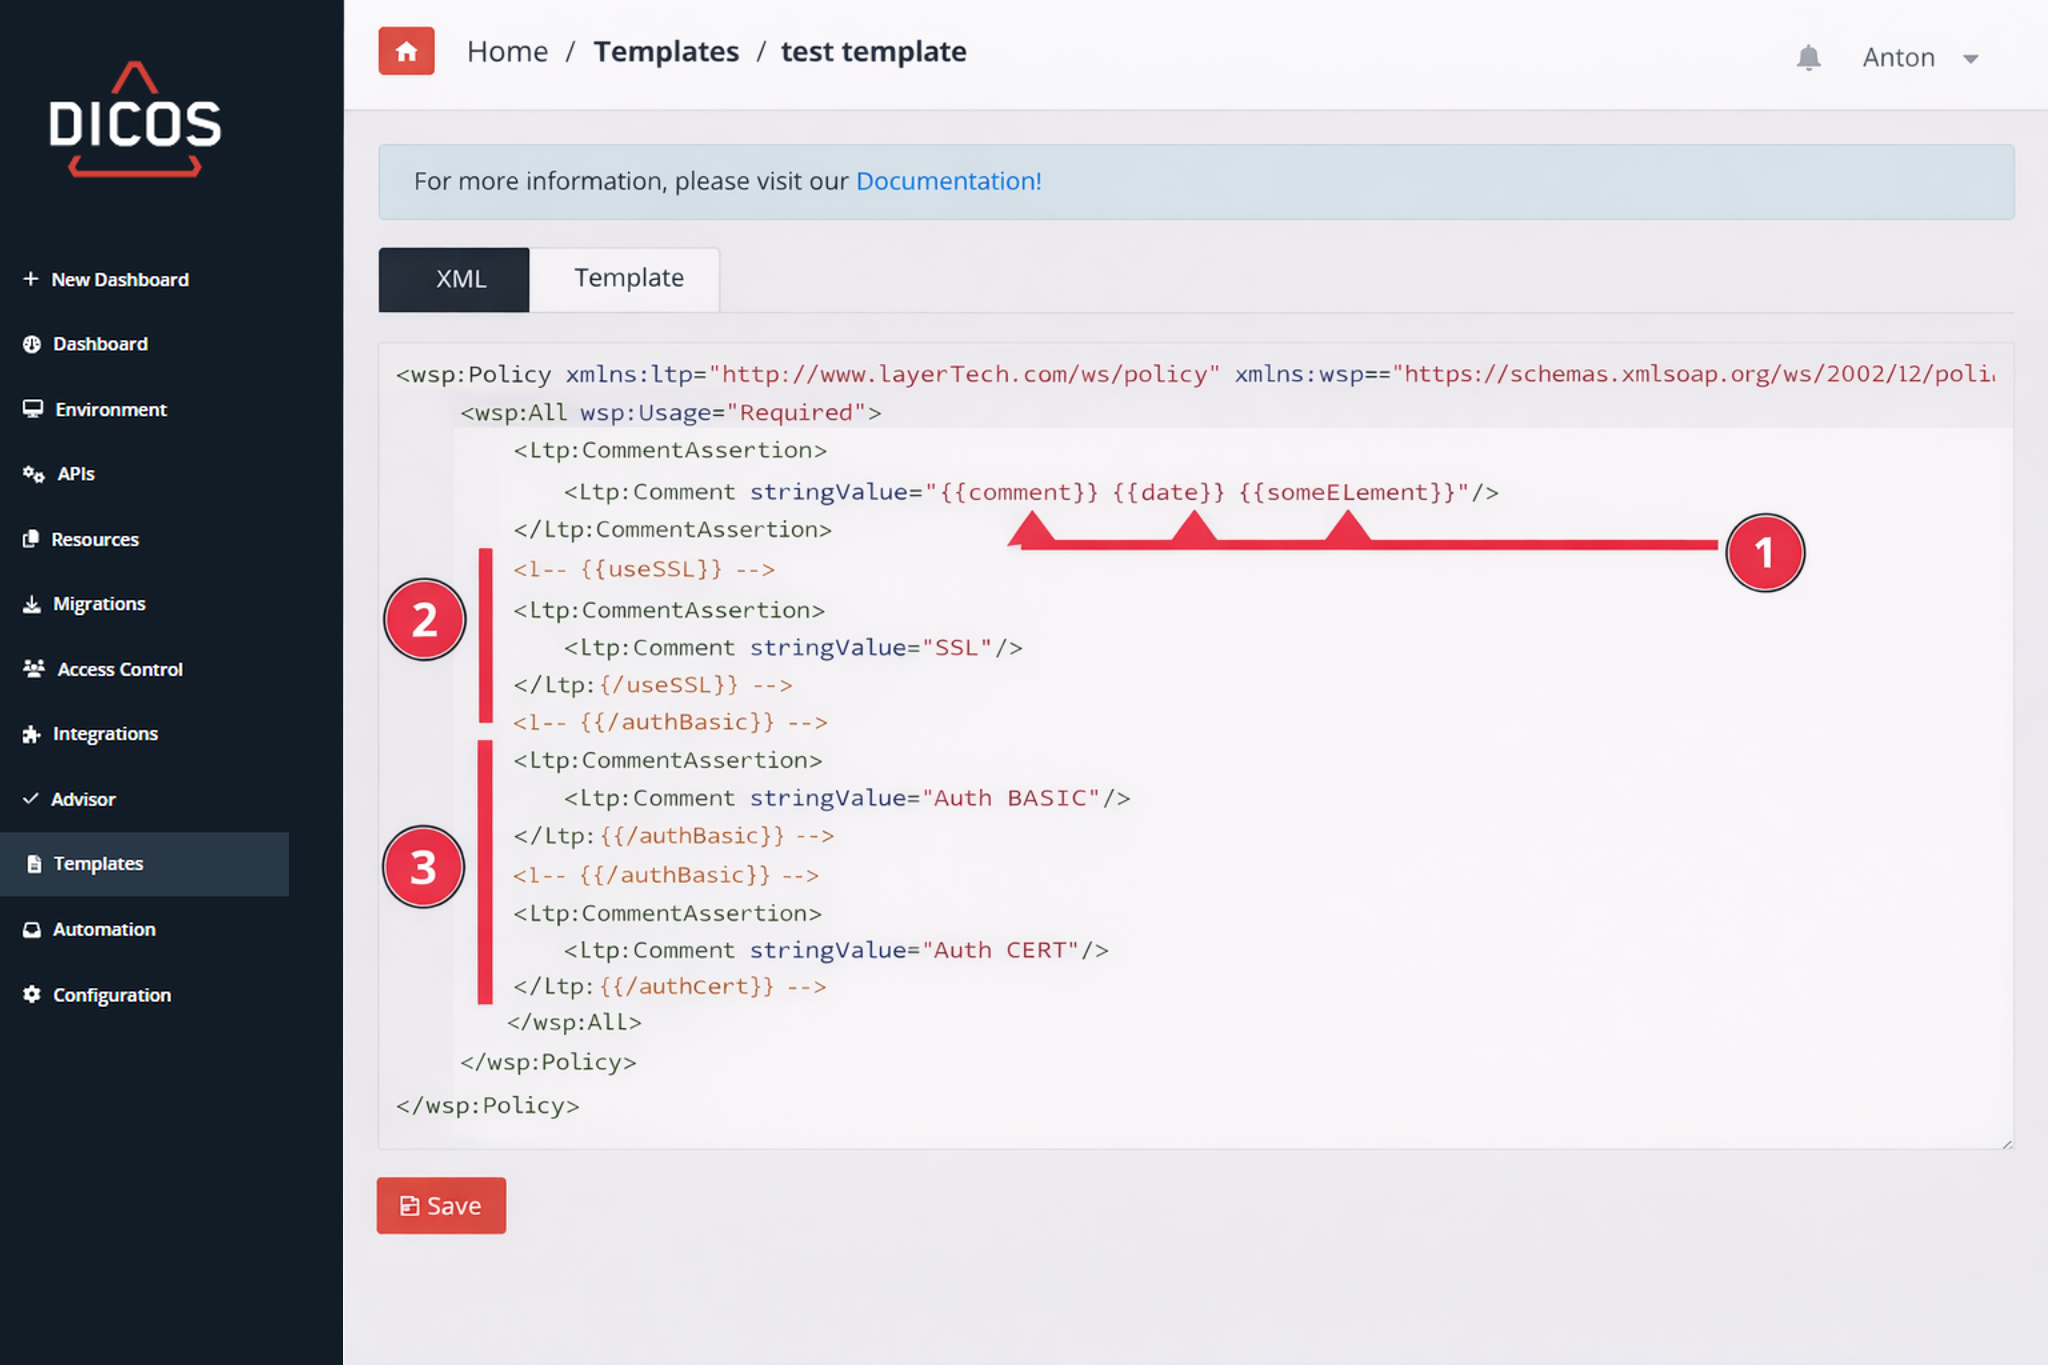
This is the edited XML that will work with the definition above Copy and paste it under the XML tab: :
<wsp:Policy xmlns:L7p="http://www.layer7tech.com/ws/policy" xmlns:wsp="http://schemas.xmlsoap.org/ws/2002/12/policy">
    <wsp:All wsp:Usage="Required">
        <L7p:CommentAssertion>
            <L7p:Comment stringValue="{{comment}} {{date}} {{someElement}}"/>
        </L7p:CommentAssertion>

        <!-- {{useSSL}} -->
        <L7p:CommentAssertion>
            <L7p:Comment stringValue="SSL"/>
        </L7p:CommentAssertion>
        <!-- {{/useSSL}} -->

        <!-- {{auth=basic}} -->
        <L7p:CommentAssertion>
            <L7p:Comment stringValue="Auth BASIC"/>
        </L7p:CommentAssertion>
        <!-- {{/auth=basic}} -->

        <!-- {{auth=cert}} -->
        <L7p:CommentAssertion>
            <L7p:Comment stringValue="Auth CERT"/>
        </L7p:CommentAssertion>
        <!-- {{/auth=cert}} -->

    </wsp:All>
</wsp:Policy>
In DAGM
XML Template example
This is what it would look like in the Gateway Manager, navigate to Templates → New Templates and copy/paste the above logics.

- These are variables, those will be substituted with the values that you set for them in the template GUI
- This enclosure makes sure that the inside XML block will be published in the logic on the Gateway only if the user will choose that variable in the GUI
- This is an if-else case, were one can choose the logic to include from a dropdown.
JSON Template example
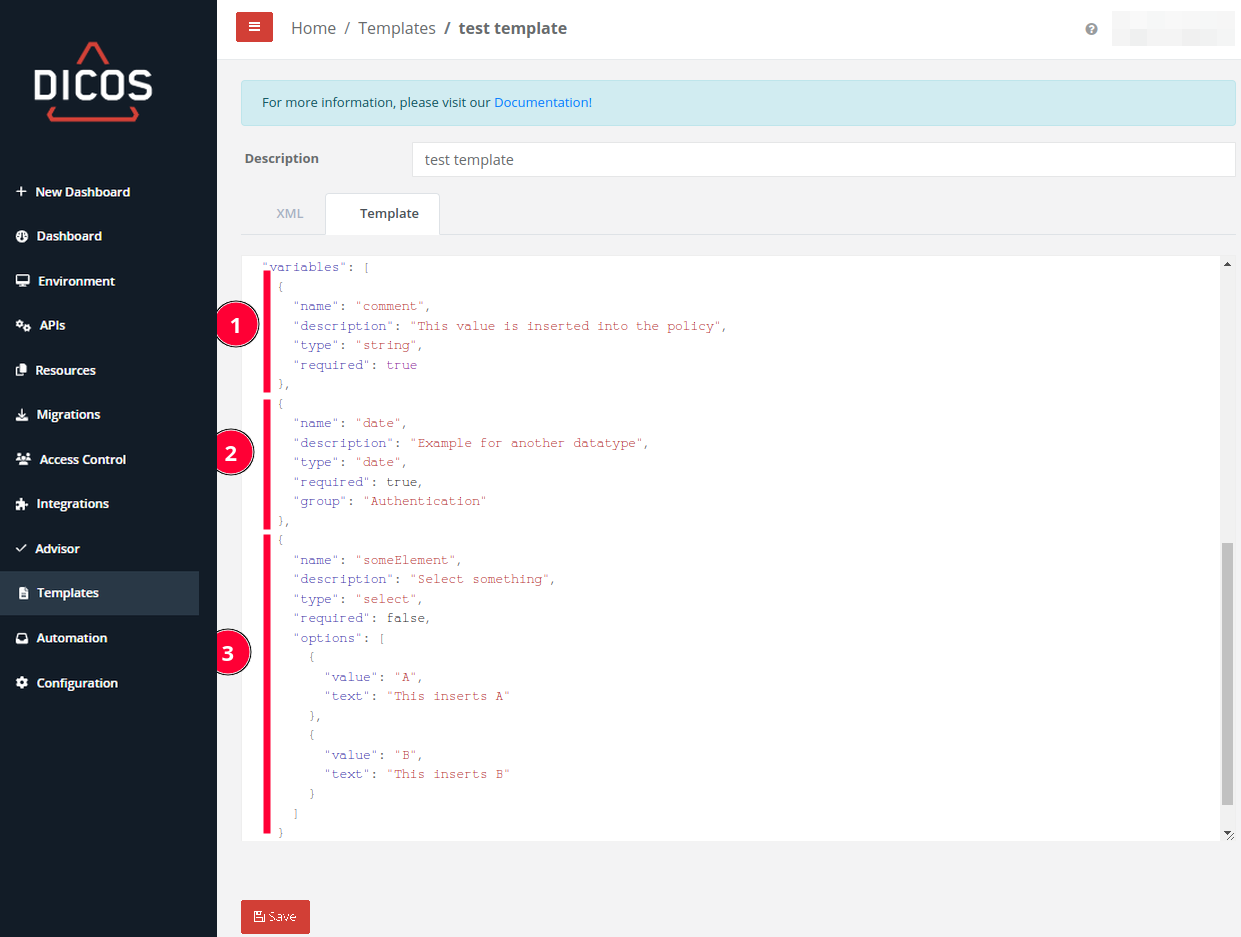
- Determines the group, this is to group together functionalities in the GUI
- This is the option that relates to point 2 in the section above (the XML)
- This is the options list that relates point 3 in the section above (the XML)
- An example of how to request a variable input that is a string on the GUI, that will be then inserted in the placeholder described in step 1 in the ‘XML Template example’ section.
- An example of how to request a variable input that is going to trigger a calendar selection on the GUI, that will be then inserted in the placeholder described in step 1 in the ‘XML Template example’ section.
Note: a Group name has been defined, which means that the Date field will appear in the Authentication group. - An example of how to add a drop-down with given choices in the GUI, from which users need to choose allowing for set values and not open-ended as the steps here above, that will be then inserted in the placeholder described in step 1 in the ‘XML Template example’ section.
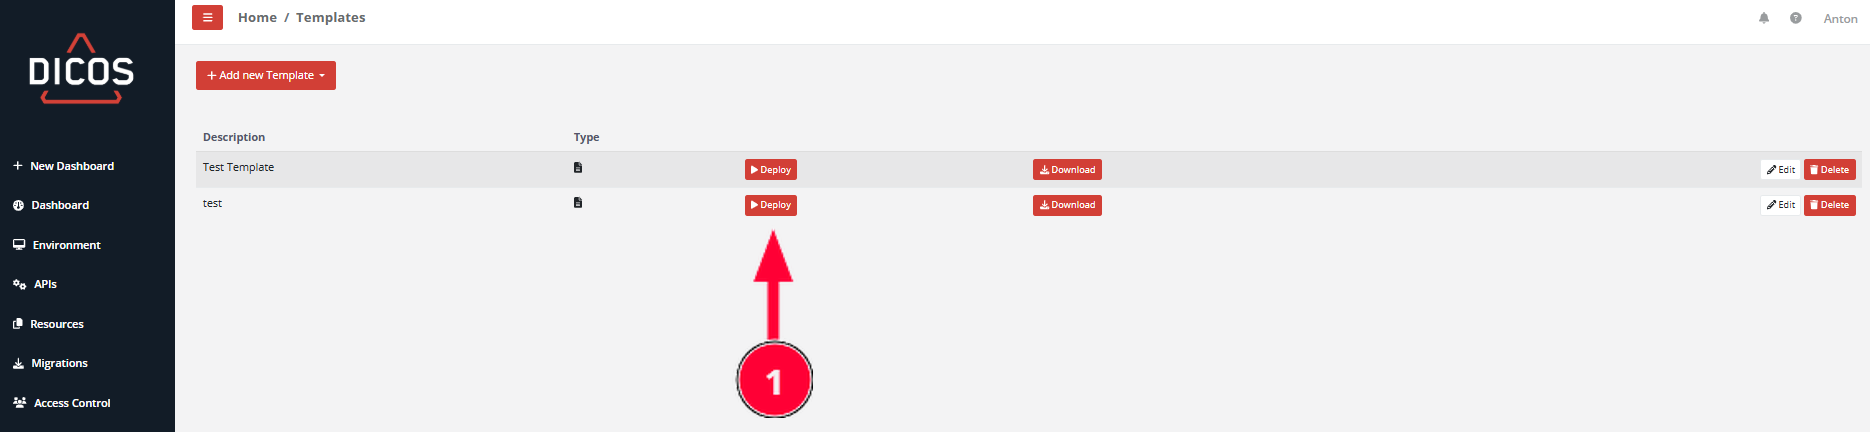
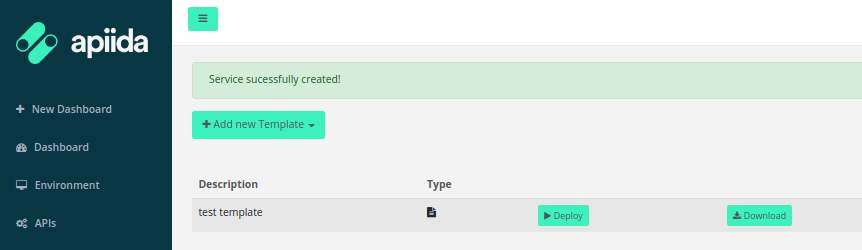
Result
Once saved here is the entry
Clicking now on Deploy (1) you will get the following screen
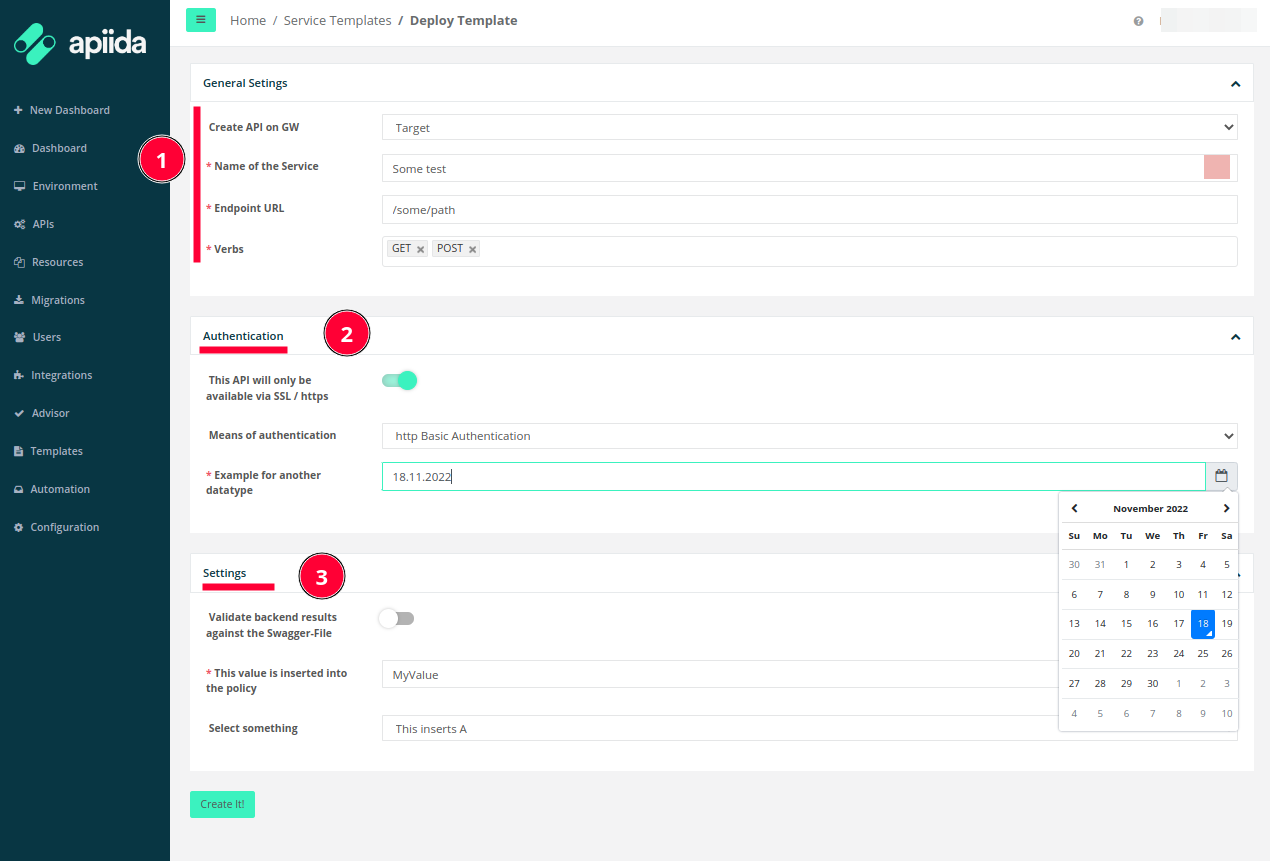
- Just some general information about the service to be deployed, this is not controlled by the JSON in the Template but is a standard form.
- That is the group that was defined in the example above.
- Any non-grouped components are listed in the Settings part, which is a sort-of Else grouping.
Push to Gateway
With the listed choices, the API is now pushed and here it is in the Gateway:
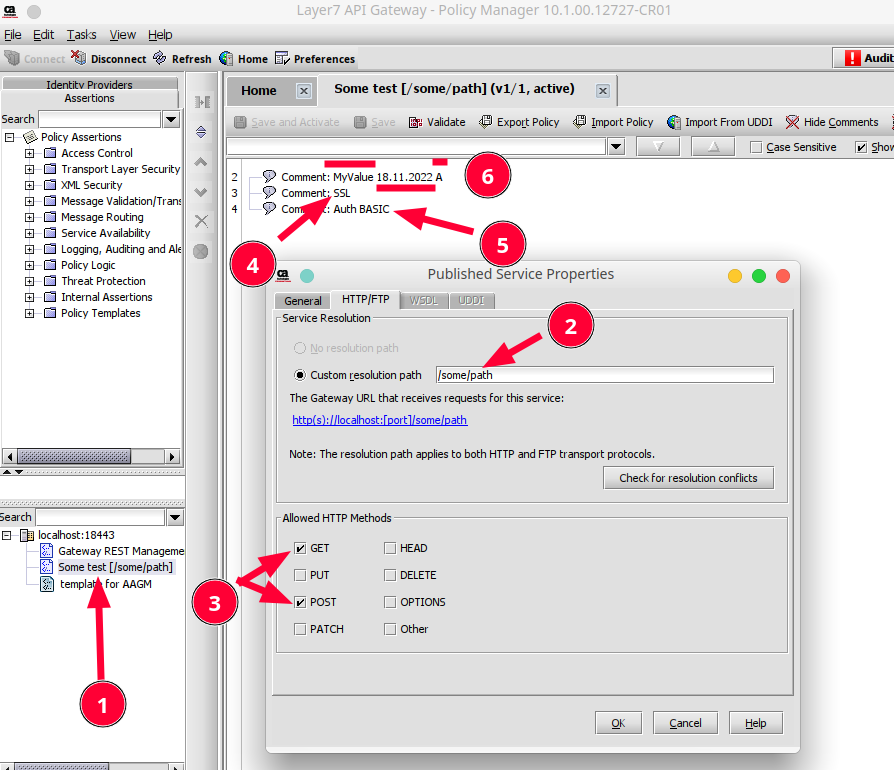
As mentioned, here is the service on the target:
- The name is the chosen one.
- The URL Path is also the right one.
- The Methods (or Verbs) are also the ones chosen.
- The SSL comment is shown as selected.
- The Basic Auth is shown as selected from the drop-down.
- The variables are all rewritten with the choices made in the GUI.